Espresso Headspace: How to Measure and Dial In Puck Clearance
As if there wasn’t enough to account for when making espresso, today we want to draw your attention to another variable that can throw off your shot: headspace.
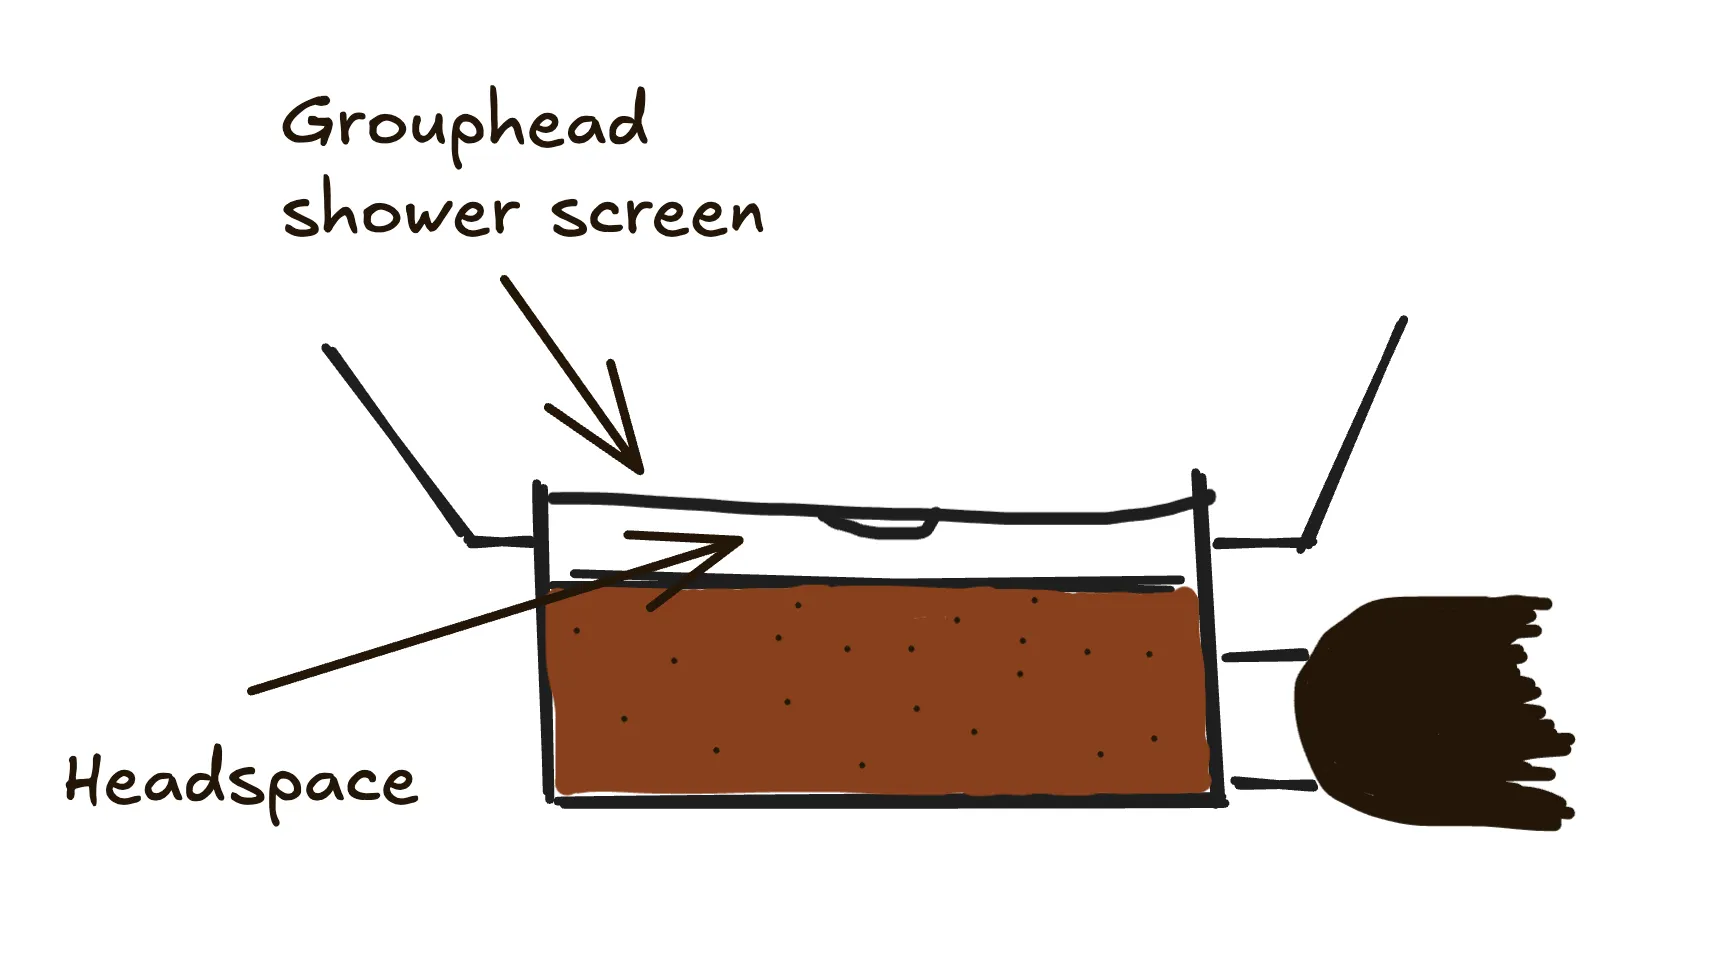
Put simply, headspace is the amount of clearance between the top of a dry espresso puck and the grouphead shower screen.
Too much or too little can have a significant impact on extraction, potentially leaving you with sour or bitter shots that can’t be improved with grind size adjustments alone.
In this article, we’ll take a closer look at how headspace contributes to extraction, and equip you with practical tips to achieve the ideal headspace in your basket.
Headspace and extraction
To get a better idea for how headspace impacts extraction, it’s first helpful to remember what’s actually happening every time you pull an espresso shot.
Hot water flows from the boiler through a number of holes in the grouphead shower screen and into the puck below.
When the water hits the puck, it encounters resistance, creating pressure as the water flows through the coffee bed.
With an even enough flow rate across the puck, the espresso that emerges on the other side will be well-extracted, with the water pulling an ideal amount of the coffee solids and oils that we all love into the cup with it.
Uneven flow, or channeling, occurs when water encounters a path with less resistance than its surroundings, rushing through the channel and pulling a disproportionate amount of the acidic-tasting compounds in coffee (which are the first to be extracted) with it in the process.
In other words, channeling is the enemy of delicious espresso.
So where does headspace come into this? Let’s start with what happens when there’s too little headspace.
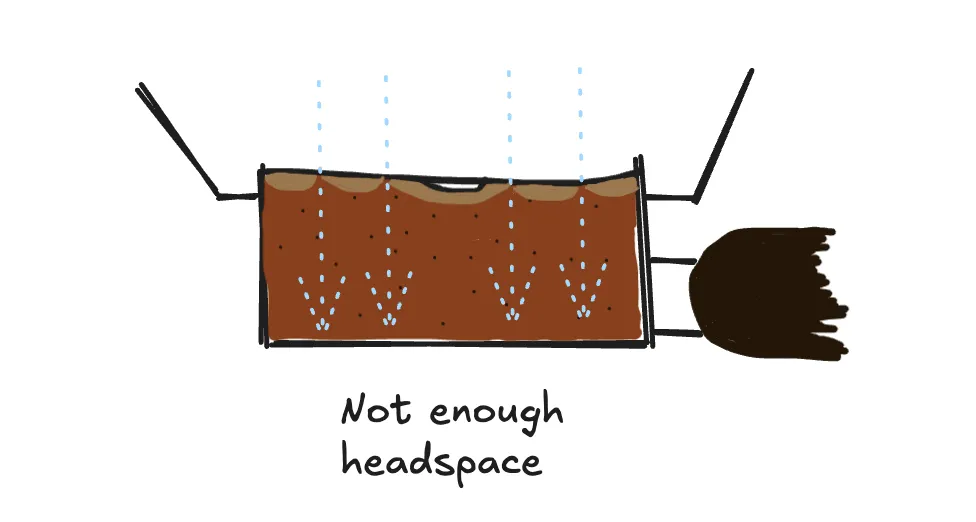
As the water is pushed through the puck, the puck will expand. If there’s no room for it to do so, then it will be pushed against the group shower screen.
Not only will this make for more cleaning afterwards, it also means that some of the espresso at the top of the puck is in direct contact with the gaps between the shower screen holes, making for dry areas at the top of the puck and uneven distribution in the spaces between them.
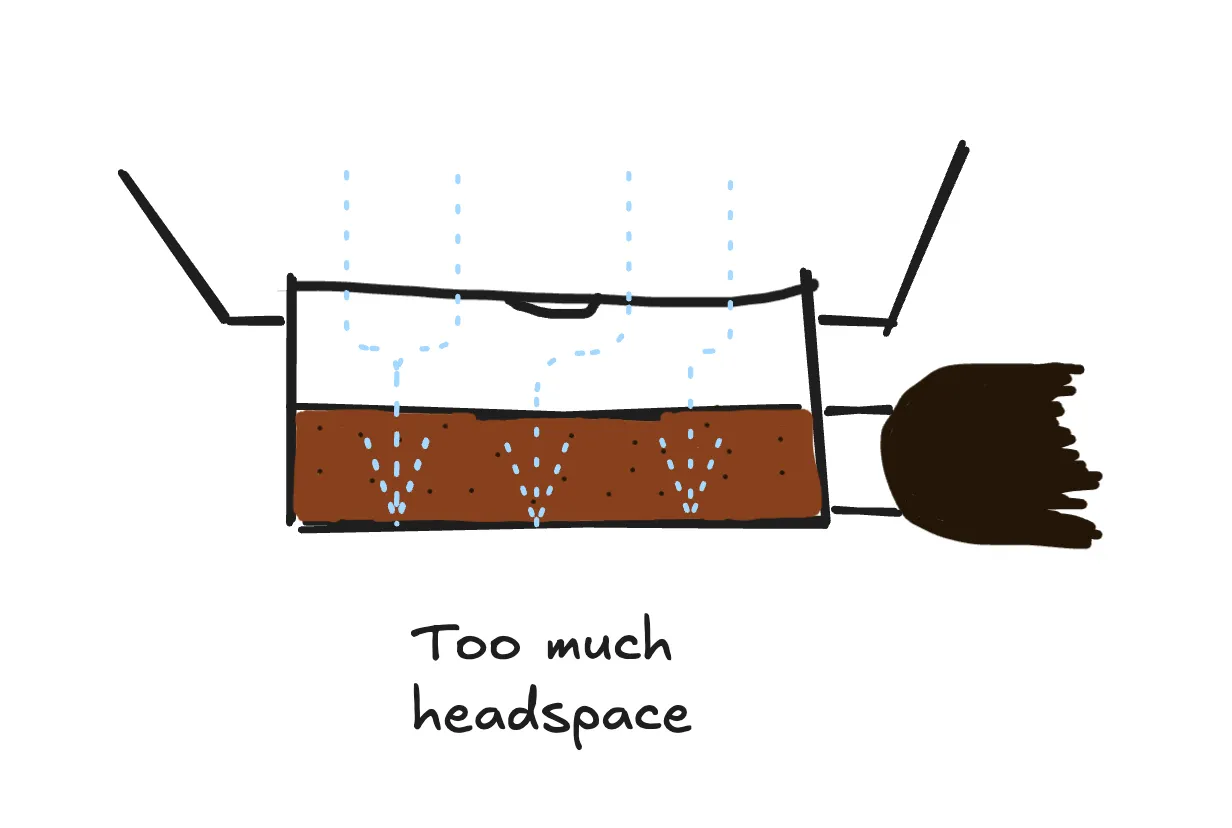
Too much headspace, on the other hand, allows the pressurized water above the top of the puck to create currents and unevenly erode the puck (creating channels in the process) as brewing continues.
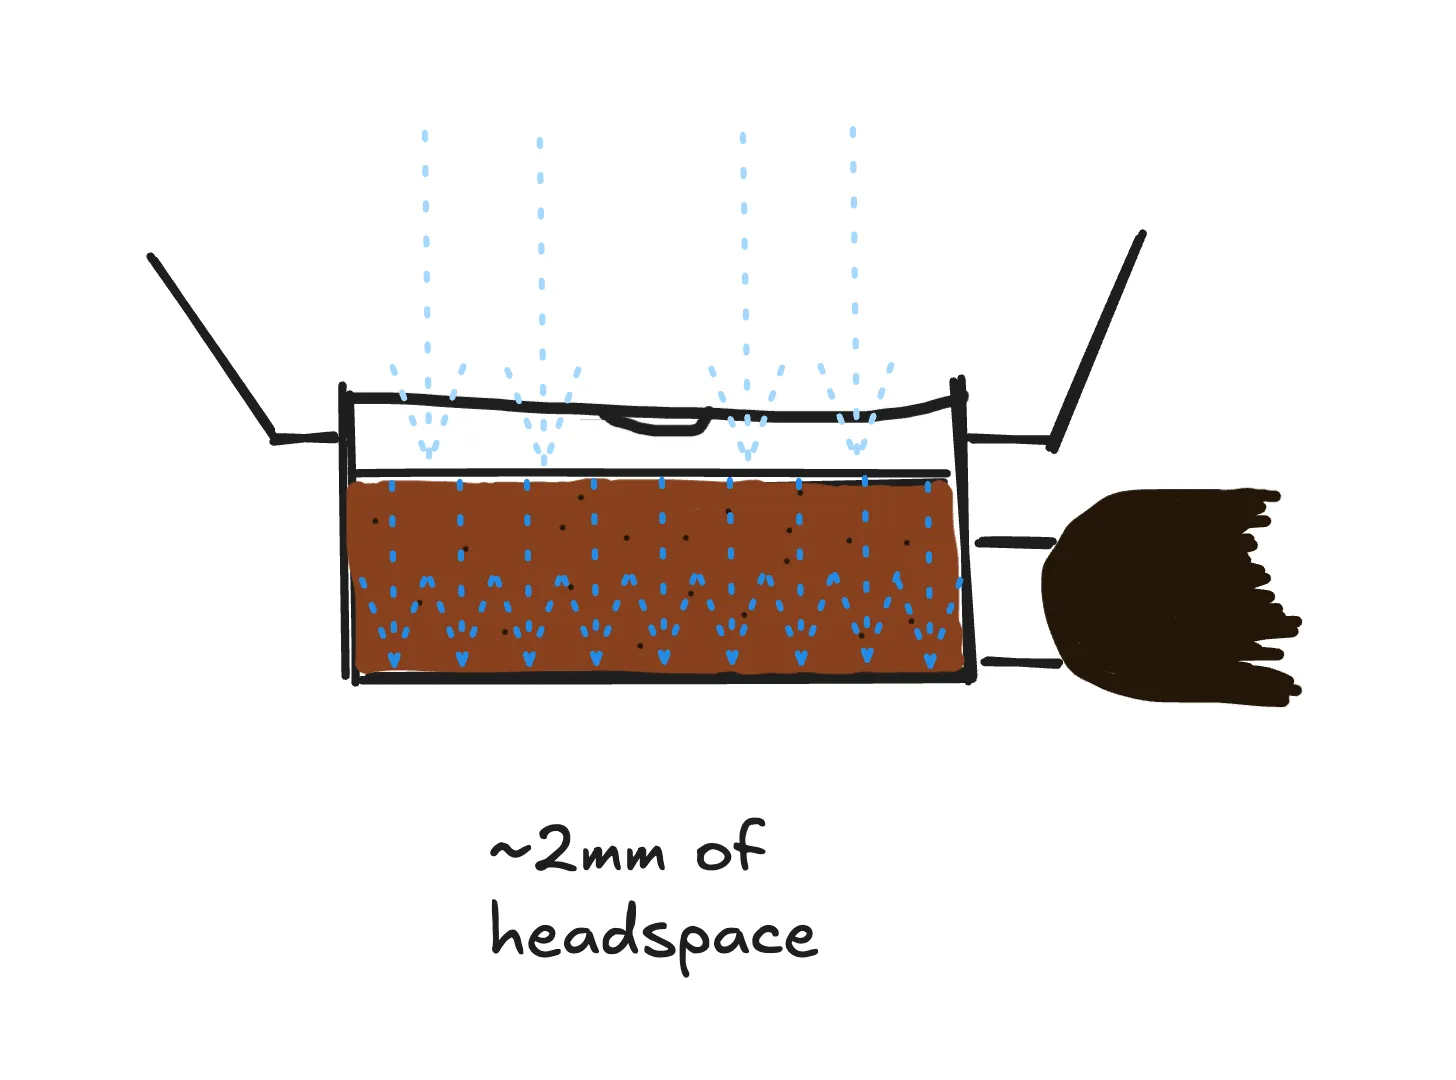
The ideal amount of headspace (widely considered to be 2mm) enables the pressure to build evenly across the top of the puck to create a stable flow rate as the water passes through the ground coffee on its way to the cup below.
There are two easy ways to tell whether you’ve created too much or too little headspace at a glance (we’ll share some strategies for getting a more precise measure later on)
To tell if you’ve left too much space, wait until after the shot has been pulled. If you’re left with a wet, indented puck after you remove the portafilter, that’s a signal to try to reduce headspace.
To tell if you’ve left too little, prepare your dose and lock the portafilter into place. Before pulling the shot, remove the portafilter. If you see an indent from the shower screen on your dry puck, that’s a signal to increase headspace.
That sounds simple enough. Surely once you’ve settled on a dose that fits your basket you shouldn’t have to worry about headspace again, right?
Unfortunately, as most things espresso-related turn out to be, it’s not that straightforward.
How different roasts impact headspace
Creating an ideal headspace becomes a moving target because of the varying densities of coffee beans at different roast profiles.
Because the process of roasting coffee causes beans to lose moisture, expand, and become more brittle, the less time a bean has spent roasting the denser it will be.
If you’re reading this, you more than likely use a scale (and if you don’t you really should), which means you’ll always end up with the same weight for a dose regardless of the profile. What will vary depending on the roast you’re using is volume.
An 18g pile of Neapolitan style grounds is likely to look noticeably bigger than an 18g pile of light roast grounds. When we consider headspace, that could be a problem.
Tamp the Neapolitan style dose in an 18g basket, and there’s a chance you don’t have enough headspace. Tamp the light roast and the opposite could be the case.
Every basket manufacturer takes into account the need for excess space when creating different basket sizes, but the broad spectrum of roast profiles that exist in the world of specialty coffee means you may have to change your dose weight or even your basket size to get the best results out of your coffee whenever you try out a new bag of beans.
In the section below, we’ll walk you through how.
Baskets and ratios: dialing in with headspace in mind
We looked at two methods that you can use to eyeball whether you’ve left too much or too little headspace. But what if you want to hit the exact sweet spot of 2mm?
The cheapest option is what’s known as the nickel test and it costs a one-time-payment of $0.05.
A nickel is exactly 1.95mm thick. To see if you’ve left adequate headspace, you can prep your puck, place a nickel on top of it, and lock the portafilter into the grouphead.
Remove the portafilter before pulling a shot. If the nickel has left an indent, you’re under 2mm. If it hasn’t, increase the size of your dose bit by bit until you first see an indent to track the exact weight at which you’ll hit the magic number.
Nickel Test Steps
- Dose, distribute, and tamp your coffee as usual.
- Place a clean US nickel (approx. 1.95 mm thick) flat on the center of the puck.
- Lock the portafilter into the group head without pulling water, then immediately remove it.
- Check the coin:
- Deep impression: Overdosed (too little headspace).
- No contact/dent at all: Underdosed (too much headspace).
- Faint impression: The ideal sweet spot (~2 mm).
If that sounds a bit finicky (and if the idea of pocket change touching your coffee sounds gross), then you can pool together 199 nickels and buy something like this, Breville’s Razor tool which offers a visual guide for measuring headspace (you can also find a handful of cheaper no-name options available on Amazon).
If you’ve got a handful of different baskets on hand, then you may find that going up or down one size helps you hit a 2mm headspace while maintaining a standard dose size.
Let’s go back to our Neapolitan style beans as an example. They may be so dark compared to a standard dose that an 18g dose fits perfectly in a 20g basket. If so, problem solved.
If changing baskets doesn’t magically result in the perfect headspace, or if you don’t happen to have a range of baskets lying around, then the secret to dialing in comes back to our good old ratios:
- Ristretto: ~1:1.5
- Normale: 1:2
- Lungo/turbo shots: 1:2.5 - 1:3+
If you’re shooting for a standard 1:2 30-second shot, and you’ve arrived at, let’s say, a 2mm headspace with a 16.5g dose of dark roast coffee, then in that case, we’d use our ratio to shoot for 33g of espresso in 30 seconds.
Ratios are a great guide for hitting the flavor profile you’re after once you’ve got your volume, but it’s your taste buds that will ultimately tell you what you need to do from there.
If your puck prep looks good and what you’re getting is still tasting sour, then you may want to move to a finer grind setting.
If you’re using a light roast and you want to unlock some of the floral, sweet notes in your beans, then you may go the opposite way and grind coarser for a turbo shot.
Ensuring you’re working with a ~2mm headspace, will give you the flexibility to tweak the other variables involved with dialling in, secure in the knowledge that you’ve created the conditions for even extraction.
Conclusion
In the pursuit of the perfect cup of espresso there are some variables that sit at the top of the hierarchy in terms of importance. Grind size comes to mind, and it probably takes the crown as the single most important factor in getting a decent-tasting cup of coffee.
Headspace can be seen as a secondary variable, and alongside the other elements of puck prep like distribution, it’s worth exploring if you’ve been doing the basic things right, but still seem to end up with shots that are too sour or bitter.
Not everyone is going to buy a Breville Razor to get their headspace right down to the millimeter, and some people may prefer to add a puck screen to their prep routine in order to encourage even extraction and keep their grouphead shower screen clean.
For everyone else, hitting a ~2mm headspace is an underrated way to maintain control over your shots, and make better tasting coffee in any roast profile.